Graphic Novels: The Tools of the Trade
August 8th, 2013
First, I’d like to say that there’s no wrong way to make comics, and cartoonists use lots of different methods and mediums to create stories. These just happen to be mine.
(For more on why and how I create each stage of a graphic novel, read my previous post, How Do You Make a Graphic Novel (and, Why Do They Take So Long?)
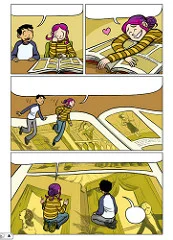
Thumbnailing stage:


My ‘writing’ process looks like this. I create a thumbnail version of each page in a story, quickly roughing out the panel layouts, which characters are where, and what they say. At this stage, I’m using cheap copy paper and a cheap mechanical Papermate pencil. I know I should really be using a reusable lead pencil, because these disposable ones are terrible for the environment…but I’ve never found one I liked!
The manuscript:

Once my editor and I are happy with my story, I type out the dialog, panel by panel, page by page, right from what I wrote in my thumbnails. I use Microsoft Word on my laptop.
Layouts:


Now, I transfer my rough layouts onto a fresh piece of Bristol board (my favorite brand is Strathmore, series 300), using a Prismacolor Col-erase light blue colored pencil. Some artists simply scan their thumbnails into a computer and then print the layouts onto their Bristol, but I’m old-fashioned in wanting to do everything by hand.
Why a blue pencil, you ask? Well, for a long time, graphic artists used something called a non-photo blue pencil. It’s called that because when you scan or photograph this color, it’s invisible! That means all you can see is the graphite or ink on top of it. Cartoonists often use blue pencils for this reason. Of course, technology has improved by leaps and bounds in recent years, and scanners and photos can pick up the blue…but it’s pretty easy to adjust the file in Photoshop and just drop out the blue lines digitally. My favorite pencil is this Col-erase light blue, because the lead is a little softer and less waxy than a non-photo blue.
My paper size varies. Most of the time, I use 11 x 14-inch paper, but I drew Smile slightly smaller than my other books, at 9 x 12. Since the graphic novel I’m currently working on, Sisters, is a companion book to Smile, I’m working small once again.
Pencils:


Next, I pencil over my blue layout panels. I use a simple graphite pencil at this stage. For a while, I used a Staedtler Lumograph F pencil, but these days I use the same cheap-o mechanical pencil I use for my thumbnails, the Papermate. I also need my big Staedtler Mars Plastic eraser handy, because sometimes, you’ve got to draw something multiple times before it looks right!
Inks:


This is my favorite part of the comics-making process. I ink over my pencils with a Windsor & Newton Series 7 sable watercolor brush. My favorite brush size is #2, although I sometimes use a #1 or a #3. My ink of choice is Dr. P.H. Martin’s Black Star, but my husband has a giant bottle of Speedball Superblack waterproof India ink right now, so I’ve been using that. Ink brands vary in viscosity and light-fastness, so it’s good to try a few in order to find your favorite. My faves tend to be super-black and very thin.


For very small details, like eyeballs and shirt buttons, I use a Faber-Castell Pitt Artist pen. My favorite widths are F and M. I also use Microns, because they make them in really fine widths—I often have a 005 and a 01 lying around. The Micron ink isn’t as lightfast as the Faber Castell unfortunately, and after a few years, it starts to fade.
The liner pen is also used to ink word balloons.
Erasing!


Staedtler eraser strikes again. This thing gets a workout, cleaning up all my messy pencil lines! I also have a big brush called a Draftman’s Duster, specifically for sweeping the eraser crumbles off of my pages.
Scanning:

I’m lucky to have an oversized scanner in my studio. Aside from my computer, this is the most expensive tool I own—and it’s invaluable. I scan my art as black and white, or lineart, files at 600 dpi.
Digital Cleanup:
Now, I have digital art files of every single page! But because I haven’t cleaned up all my stray lines with white-out, there’s usually some cleaning up to do. All my fixes are made digitally, using Adobe Photoshop. I also add my panel borders digitally!

At this point, the book enters the production stage, which I oversee.
Coloring:
I work with professional colorists on my books. I’m capable of coloring my own comics, and usually color my own work when it’s a short story, but in order to speed up my process, I hire someone else to color full-length books. We all use Photoshop, the industry standard for coloring comics digitally. (Drama was colored by the Japanese creative team Gurihiru, an incredible two-woman powerhouse comics studio. They’ve illustrated Marvel’s PowerPack, and most recently have illustrated the Avatar: The Last Airbender comics from Dark Horse.)
Once the color files come back to me, I make any last-minute changes, and then prep the files for print (a process involving Photoshop that I’m not great at explaining—but basically you need to make sure the printing press knows to print all the colors on one layer, and then overlay that with a very solid black ink for all the linework). I send these color files over to the book designer, Phil, at my publisher.
Lettering:

I also work with a letterer! He takes all the dialog from my manuscript, and pastes it into an Adobe Illustrator template to fit into my hand-drawn word balloons. Sounds simple, but there’s an art and a skill to this. He sends all the lettered files to my designer, Phil.
Final design and book mock-up:

This all happens magically at the publisher, but I get to see drafts of the book’s design as it is being prepared by ace designer Phil: the front and back covers, any jacket copy (these are all called mechanicals when they’re still computer files), page number placements, title pages.
The publisher gets a set of color proofs, which is the last chance to catch any mistakes or adjust the colors (are they too light? Too dark? Too saturated? Etc.), and because I live in the same city as my publisher (one good reason to pay the high rent in NYC, I guess?…), I get to look at these in person. It’s fun—Scholastic has a special room with special lighting, and a production manager whose job it is to hang out with me while I go over every little detail. There’s even a little magnifying glass for looking super closely at the individual ink spots on the paper!

(The above image is not mine–photo credit to Greenwillow Books’ blog!)
After all of this, the book gets shipped off to print, and I go back to the beginning of the process, working on a new project with my simplest tools: pencil, paper, and ideas.
I buy most of my art supplies (paper, pencils, and brushes) online from Dick Blick.
This essay was originally posted on Inside A Dog. © Raina Telgemeier.