How Do You Make a Graphic Novel (and, Why Do They Take So Long?)
Graphic novels are an amazing medium. They say a picture is worth a thousand words, and an average graphic novel has somewhere in the ballpark of a thousand pictures in it…so, that’s worth a lot of words!
But how do they come to be? Most authors get ideas for stories, type up an outline, and then flesh that outline into paragraphs, chapters, and finished a manuscript. Cartoonists also do that, but there are pictures involved, too. They’re not an afterthought, but a part of the process from start to finish.
Here’s what goes into making one of my graphic novels.
1. Idea!
All good stories have to start somewhere. My ideas come from many places (see my previous post for more on this), and the origins of my stories can either be pictures or simple sentences. With Drama, the glimmers of the idea came from just thinking about my own theater days in high school, and the friends I made during that time.

I looked at lots of old photographs, and considered writing a story about drama kids. I wanted them to be on stage crew, which is something I always wanted to try but never did. Callie’s name came to me when I was driving around northern California a couple of years ago, and the song “Goin’ Back to Cali” was playing on the radio. That’s embarrassing, but there you have it.
2. Pitch!
Eventually, an idea needs to be turned into a pitch. Can the story idea be summarized in a couple of paragraphs? It needs to be, if it’s going to be published. Drama’s pitch was simple:
The kids of Eucalyptus Middle School are putting on a school play. Callie is a set designer who keeps falling for the wrong boys. She makes friends with two twin brothers, Justin and Jesse, and their friendship becomes as dramatic as the play itself! But the show must go on, and everyone must work together in the end.
…Or something like that.

I also created drawings of all the main characters in the story. Some of their designs changed a lot between these early drawings and the final book!
3. Detailed Outline!
The next step was to create a full outline. I typed up several pages, explaining what would happen in every scene in the story. I worked and re-worked this until it felt right. Scenes that were clear in my mind didn’t always fit the overall story, and were cut or re-arranged. Others were added.
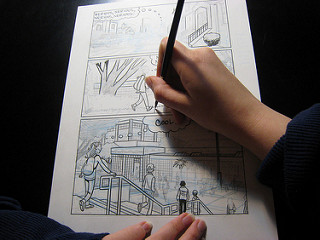
4. Thumbnails!

So, my editors at my publisher liked my pitch! Hooray! They asked to see a full draft of the story, and I set to work. For me, this is the most challenging part of creating a graphic novel, because until I start the thumbnails, I don’t know where the story might go. Oh, sure, I had my outline to work off of…but for me, thumbnailing ISwriting. I don’t script out the characters’ dialog in advance on a computer. They speak to me through word balloons and stick figures in panels. Writing comics means writing out the pacing, panel by panel, spread by spread, which sometimes includes panels (and pages) where there is no dialog at all, but the pictures take the place of exposition or description, so they’re important to include in the thumbnails. This is also the most challenging part of my process to explain to people. Thumbnailing is just like writing with a pencil on paper. You’re just doodling too, and putting everything into boxes.
But the lovely thing is, when you’ve thumbnailed your book, you know exactly how long it’s going to be, and have a pretty good idea of what it’s going to look like! The drawings aren’t finished, but this draft can now be “read” by an editor. This is where my publisher steps in and decides whether the story is good or not. Does it need to be revised? Edited? Expanded? Shortened? It’s much more economical to edit thumbnails than finished artwork, so I’m happy to work out all the kinks here.

I thumbnailed Drama twice. My editors felt the story as I wrote it wasn’t quite working. The main problem was I originally wrote the characters as high-school aged, but my editors felt they should be in middle school. I grappled with whether this would be possible, but the only way to figure it out was to just sit down and write another draft. That meant re-drawing about 75% of my thumbnails, adding another 6 months to the writing process!
5. Layouts!
Once the thumbnailed script was approved, I had a perfect template for drawing the finished book. I switched over to large, sturdy paper, and started laying out the final pages.
DISCLAIMER: I didn’t scan my layouts for Drama, so you’ll just have to make do with this photo of a layout from one of my Baby-sitters Club graphic novel pages instead. Bad Raina!

Layouts are kind of nebulous to explain. I use a blue pencil, rule out all of my panels by hand, and then draw in loose underdrawings, using the thumbnails as a guide but always trying to improve and clarify as I go. I loved gesture drawing when I was in university—the fast, flowy, gestural drawing we did to capture the energy of the model. It’s not unlike looking at an animator’s work. Check out Glen Keane’s loose sketches of his characters: he’s trying to capture their essence on paper.

The looseness and sketchiness will be cleaned up later. That’s what layouts are like: trying to convey energy, flow, body language, and spirit…while still leaving enough space for all the dialog!
Composition also plays a huge role in layouts. I’m working out things like perspective and scale, and trying to make everything fit harmoniously into the panel boxes. Is the composition pleasing, overall? Do the shapes look nice together? They should! If something needs fixing, it’s best to fix it now, because later I tend to go into autopilot mode. If layouts are well done, the page will look good, even at this stripped-down, sketchy stage.
6. Pencils!

I pencil right over my layouts. This is refinement. The energetic underdrawing is there, and now I’m working out all the details. Facial features, hands, clothes, backgrounds, everything you’ll see in the finished artwork. Again, I’m constantly refining. This stage takes a lot of concentration, but it’s very rewarding.
7. Inks!
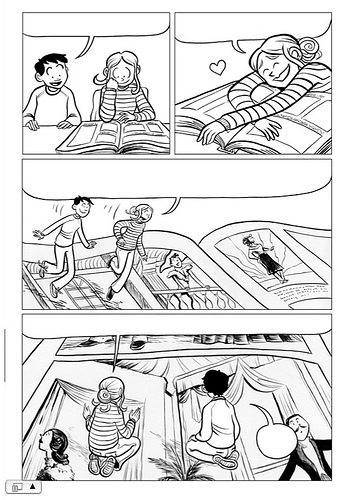
Ah, how I love to ink! For one thing, I love using a brush. It’s just so…flowy! At this point I’m going over my pencils, varying the pressure on my brush to create thick and thin ink lines. This is when everything starts to really come to life for me. I do all my brush inking first (I can ink up to eight pages in a full workday!), and then go back in with a technical pen and fill in tiny details like eyeballs, shirt buttons, and anything else the brush would be too large for.
8. Scanning!

I sit in front of my computer for a couple hours and scan all my pages in. I scan at 600dpi, black and white / lineart.
9. Cleanup!
Also kind of boring, but because my inking style is fast and loose, I tend to have a lot of messy crossed lines and screw-ups that need a quick correction. Instead of using white-out on my physical pages, I make my corrections digitally. I also drop in my panel borders, and make sure all my stray lines are closed off before sending the finished, cleaned up pages off to my colorist.
10. Color!

I don’t do this stage myself. I could, but it would add 6-9 months to my production schedule. Instead, I work with a colorist (Drama’s colorists were the amazing Japanese art duo Gurihiru), often giving them samples of the colors I want or sending them reference photos if they’re coloring a real place or thing. The pages come back to me (we use Photoshop) for final approval before getting sent back to my publisher, so if anything is the wrong color or I just had something different in mind, I make corrections to the files. Then I flatten the colors, prep the lineart for print (a technical process I can’t even begin to explain), and stick them all on a server for Scholastic’s art director. (A note: the image above was approved and sent off, but my editors decided at the last minute that the yellow color scheme of this scene wasn’t working to their satisfaction! So we did a few tests, and the final version of this page can be seen in the final version of Drama.)
11. Lettering!
Oh yeah, I typed up the manuscript once the thumbnails were approved. It’s pretty basic: “Page 1. Panel 1. Callie: Hey, Matt. Matt: Hey. Panel 2…” And so on. This gets copyedited, and sent to my letterer! This is another stage of the process I could probably do myself, but it saves me some time to let someone else help out. The letters are pulled right from the manuscript, and put into word balloons using Adobe Illustrator. The letterer sends these files directly to my art director, and he puts everything together on his end!
12. Cover Design!

My editors and I come up with some cover concepts, I do a bunch of sketches, and we pick our favorite. I create the final cover art, and the art director puts in the type and any other features (foil details, spot gloss, and so on).
13. Etc!
Everything else that happens, I know less about. Files are sent to an offset printing company somewhere in Asia. They send back a set of color proofs, which we go through and approve. (Is it too light? Too dark? Too blue?) Then a bunch of copies are printed, bound, and stuck on a giant boat, headed for the U.S. or wherever they’re being sold. My editor mails me a copy a few months before the book is actually published, and I get to bask in the glory of being a published author. This never gets old!

This essay was originally posted on Inside A Dog. © Raina Telgemeier.